---
gid: f22ec76a-b20f-4f2b-a3a4-c556cf603111
title: Build a discounts UI with Admin UI extensions
description: Learn how to use an Admin UI Extension to create a UI in Shopify admin for configuring a Discount Function.
---
import DeployAndReinstallApp from 'app/views/partials/apps/discounts/deploy-and-reinstall-app.mdx';
import ReviewFunctionExecution from 'app/views/partials/apps/app-extensions/review-function-execution.md';
import NextStepsDiscounts from 'app/views/partials/apps/discounts/next-steps-discounts.mdx';
With [Shopify Functions](/docs/apps/build/functions), you can create new types of discounts that apply to cart lines, order subtotals, shipping rates, or any combination of these.
Additionally, you can use Admin UI extensions to create a UI, displayed on the discount details page of Shopify admin, for merchants to configure your app's Discount Function. To do this, this custom UI will use metafields to communicate with your Discount Function.
This tutorial describes how to create an [Admin UI Extension](/docs/api/admin-extensions) that merchants can use to configure a Discount Function.
## What you'll learn
In this tutorial, you'll learn how to do the following tasks:
- Create an Admin UI Extension, written in React and hosted by Shopify
- Build a Discount Function that applies a percentage off cart lines, order subtotal and shipping rates
- Associate your Admin UI extension to your Discount Function, so merchants can use the UI to configure the discounts provided by the Discount Function
- Configure app-scoped metafields to store discount settings
After completing this tutorial, you'll be able to use your Shopify admin to configure a Discount Function that discounts cart lines (filtered by collection), order subtotal, and shipping.
For example, follow the [Build a Discount Function](/docs/apps/build/discounts/build-discount-function) tutorial, or build your own app and Discount Function using the [Discount API](/docs/apps/build/discounts).
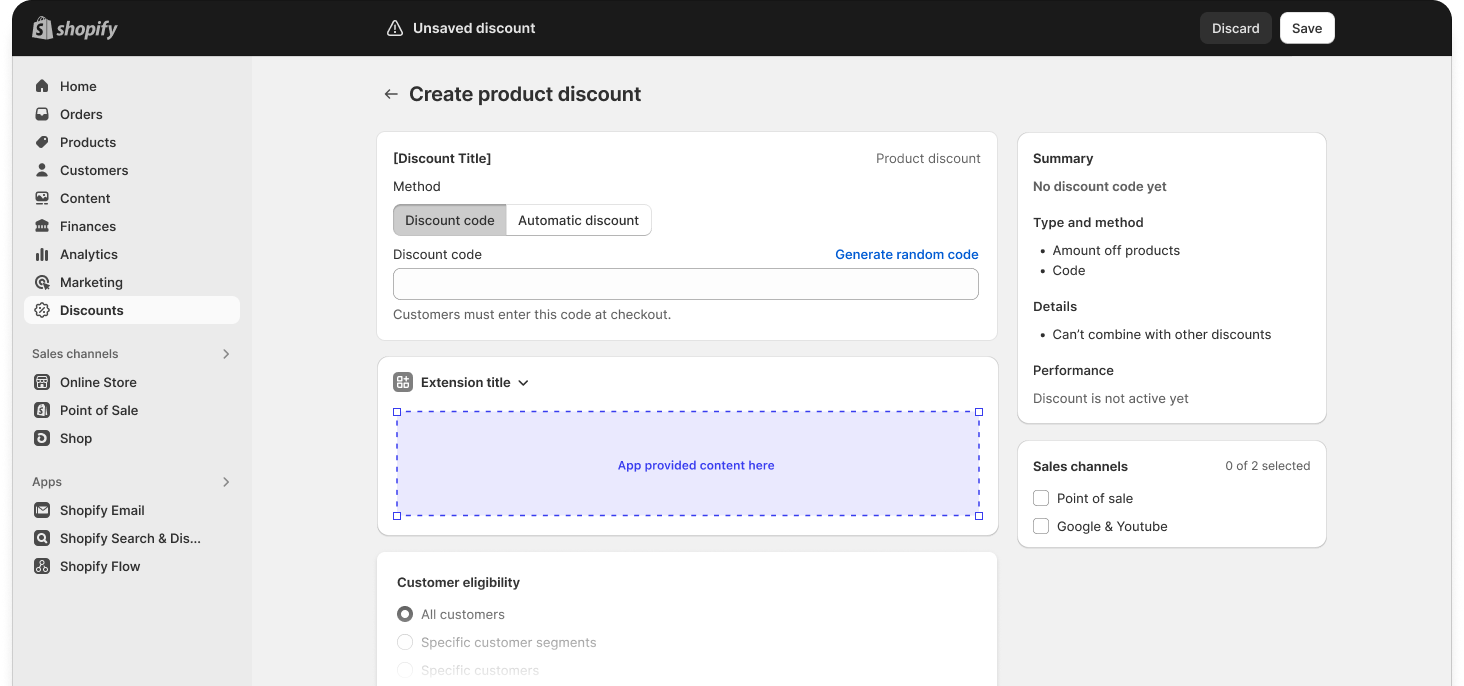
## Create an Admin UI Extension
First, scaffold the Admin UI extension that will provide the UI that merchants can use to configure your Discount Function.
1. Navigate to your app's directory:
```bash
cd directory
```
1. Run the following command to create a new Discount Function Settings Admin UI Extension:
```bash
shopify app generate extension --template discount_details_function_settings --name discount-ui-js --flavor react
```
```bash
shopify app generate extension --template discount_details_function_settings --name discount-ui-rs --flavor react
```
## Configure your Admin UI Extension
Your Admin UI extension will use a metafield to tell your Discount Function which collections of products to discount, and the specific discount percentage to offer for products, order subtotal, and shipping. The Discount Function will use this metafield to dynamically create discount operations.
### Metadata
Specify your extension's metadata in the `[[extensions]]` section of its associated configuration file. In this case, `name` and `description` will appear in the **Discounts** and discount details page of the Shopify admin.
Shopify provides localization tools, and you can use them to localize the name and description of Discount Functions. To learn more, refer to [localizing your Shopify app](/docs/apps/build/localize-your-app).
### Target
In the `[[extensions.targeting]]` section of your extension's configuration file, you'll define its `target` and `module`.
`target` specifies where in the Shopify Admin surface the extension should display. For this tutorial, set `target` to `admin.discount-details.function-settings.render`.
`module` specifies a path to the file that contains the main export.
Refer to [`App Extensions Common properties`](/docs/apps/build/app-extensions/configure-app-extensions#common-properties) for more information.
### Associate your Discount Function with the Admin UI Extension
Your Admin UI extension can configure your Discount Function. To connect them, open your Function's `.toml` configuration file and find the `[extensions.ui]` section. Set the handle property to match the handle in your Admin UI extension's `shopify.extension.toml` file.
## Review the Admin UI Extension
Before continuing on with the tutorial, review the code for your Admin UI extension, so that you understand how it's configured, how it displays data, and how it manages state.
### Initialize the Admin UI Extension
The discount details page renders the `admin.discount-details.function-settings.render` target. The `target` must be provided to the `reactExtension` function, and must match the `extensions.targeting.target` defined in the [previous step](#target).
### Use UI components
Admin UI extensions are rendered using [Remote UI](https://github.com/Shopify/remote-dom/tree/remote-ui), which is a fast and secure remote-rendering framework. Because Shopify renders the UI remotely, components used in the extensions must comply with a contract in the Shopify host. Shopify provides these components through the Admin UI extensions library.
[Admin UI extensions components](/docs/api/admin-extensions/components)
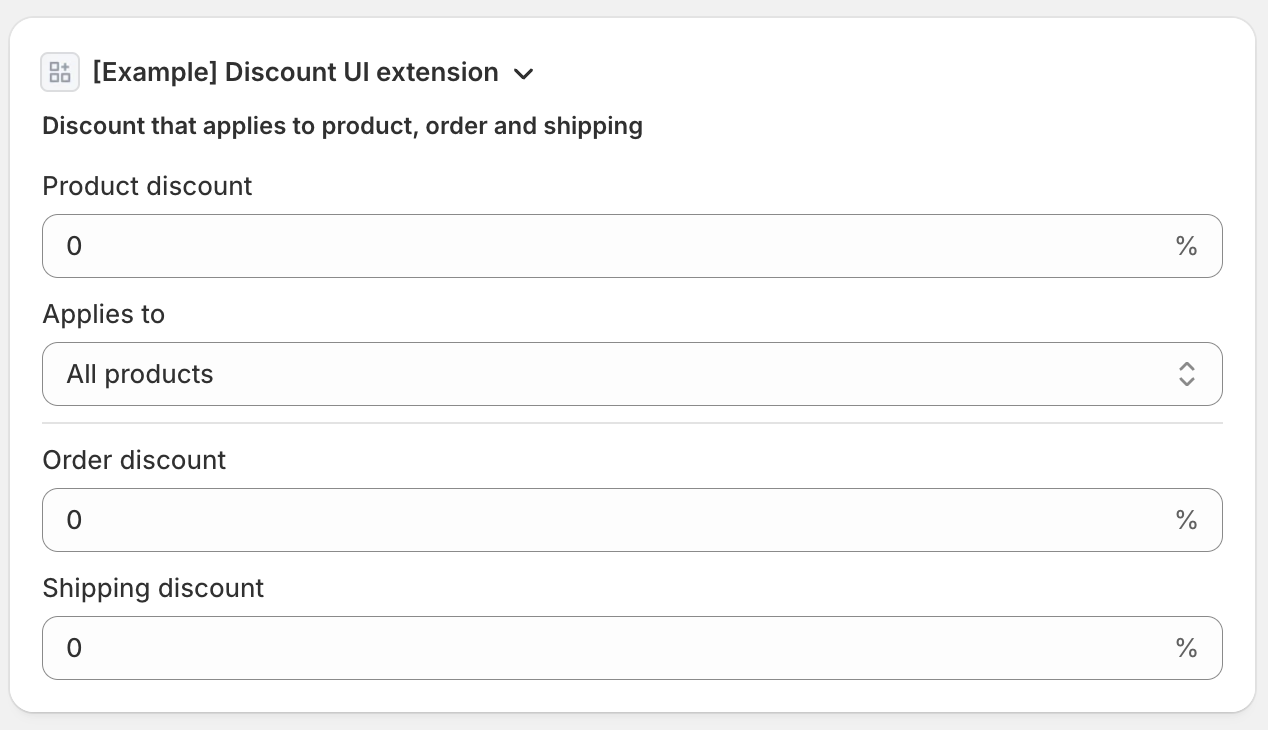
### The `App` component
The `App` component is the main component of the extension. It renders a form with percentage fields and a collection picker. It uses the `useExtensionData` hook to manage the state of the form.
### The `AppliesToCollections` and `CollectionsSection` components
The `AppliesToCollections` component renders a `Select` component which allows users to dynamically select `Collections` from your shop. To do this, it uses the [Admin UI Extensions resource picker API](/docs/api/app-bridge-library/apis/resource-picker).
The `CollectionsSection` component renders the collections section, displaying the selected collections and a button to add or remove collections.
### Manage the form's dirty state
Since the `ResourcePicker` doesn't directly update the form's state, it doesn't enable the **Save** action on the discount details page.
To fix this, add a hidden `TextField`, inside a `Box` component, and use it to store the selected collection IDs as a serialized value. This hidden field integrates with the [`FunctionSettings`](https://shopify.dev/docs/api/admin-extensions/components/forms/functionsettings) component, enabling the form to detect changes and allowing merchants to save their discount settings.
### Manage state with the `useExtensionData` hook
The `useExtensionData` hook manages the state of the form. It uses the `useApi` hook to interact with the GraphQL Admin API. The `useEffect` hook is used to set the initial state of the form.
## Metafields in Admin UI Extensions
Metafields are used to persist shared state between the Discount Function and the Admin UI Extension. Metafields are scoped to an app, and they're unique for each discount created.
### Review how the code creates metafields
For security reasons, you must create your metafield definition under a reserved namespace. Reserved metafield definitions keep your app's metafields private, and you have to set any additional permissions manually. Because this Admin UI extension runs in Shopify admin, you'll need to request these permissions when installing the app.
Use the `$app` scope to create a metafield definition under a reserved namespace. The namespace and key must be unique.
Learn more about [metafield definitions under an app-scoped namespace](/docs/apps/build/custom-data/reserved-prefixes#create-a-metafield-definition-under-a-reserved-namespace).
### Review the code that updates metafields
When a merchant uses your Admin UI extension to update a discount's details, the `applyExtensionMetafieldChange` function saves the updated form values directly into the discount's metafield in Shopify.
## Apply cart line and order subtotal discounts
Discount Functions return operations which contain discount candidates, that are responsible for applying discounts to cart lines, order subtotals, and shipping rates.
### Update the Discount Function configuration to use Metafields in input queries
Admin UI extensions can use metafields to share data with Discount Functions.
To allow your Discount Function to receive these metafield values as [input variables](/docs/apps/build/functions/input-output/use-variables-input-queries), update your Function's `shopify.extension.toml` configuration file. Under `[extensions.input.variables]`, set `namepace` and `key` to the same values set in your Admin UI extension code.
### Use Metafield properties as input variables
In the [previous step](#update-the-discount-function-configuration-to-use-metafields-in-input-queries), you defined an input variable that uses a discount Metafield. This metafield is queried and updated by the UI Extension.
The input GraphQL query can specify reference fields found in the object stored by a metafield. For example, `collectionIds` is a key present in the metafield created by the Admin UI extension created above. This is particularly useful when using fields with arguments such as the `inAnyCollection` field.
### Use input variables to query `inAnyCollection` field
The [inAnyCollection](/docs/api/functions/reference/discount/graphql/common-objects/product) field on the `product` field allows your Discount Function to dynamically determine whether a given `product` in the cart belongs to any of many collections.
### Query the metafield definition to get the discount percentages
The `namespace` and `key` must be the same as the `namespace` and `key` used in the Admin UI Extension, since that metafield stores the discount percentages configured by the extension.
### Update the Discount Function to parse the metafield
Parse the metafield which is stored on the `discount` field to get the function configuration for the `cart.lines.discounts.generate.run` target.
### Apply cart line and order subtotal discounts
Add the cart line and order subtotal operations, using the percentage values set in the discount metafield configuration.
### Discount cart lines based on collection membership
Conditionally add targets to the candidates using the `line.merchandise.product.inAnyCollection` from the input query.
## Use metafields in Discount Function delivery options target
The Delivery Options target is used to apply discounts to shipping rates.
### Query the metafield definition
The `namespace` and `key` must be the same as the `namespace` and `key` used in the Admin UI Extension.
This metafield definition is used to obtain the defined percentage for shipping rate discounts.
### Update the Discount Function to parse the metafield
Parse the metafield on the `discount` field to get the percentage value to reduce the delivery groups shipping rates.
### Apply discounts to delivery groups
Add the delivery groups operations using the percentage values from the discount metafield configuration.
## Request the access scopes for reading collections
To access collections, your app must have the `read_products` app scope. To set this up, add the `read_products` scope to your `shopify.app.toml` file.
## Test your Discount Function
### Create a discount using your app
1. In the extension preview console opened in the previous step, click on the preview link for the `admin-discount-details.function-settings.render` extension target. This opens the discount details page.
1. Your Admin UI Extension should appear on this page.
1. Configure your discount, and click **Save**.
You should see a new discount in the discounts list.

### Deactivate other discounts
To ensure that the newly created discount is the only active discount, deactivate or delete all other discounts.
### Build a cart
Open your development store and build a cart with a single item in it, use a product that belongs to the collection you configured in the Admin UI Extension.
### Validate discount application
On the cart page, you should see that your Discount Function has applied a discount to a cart line and the order subtotal.
When you navigate to the checkout page and provide a shipping address, you'll see the shipping discount.